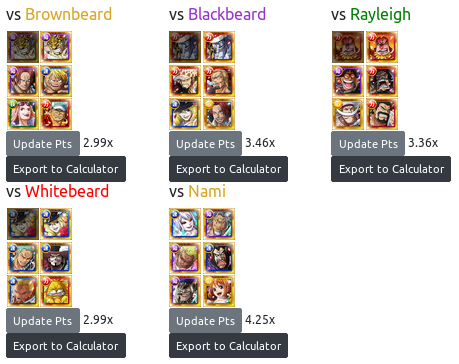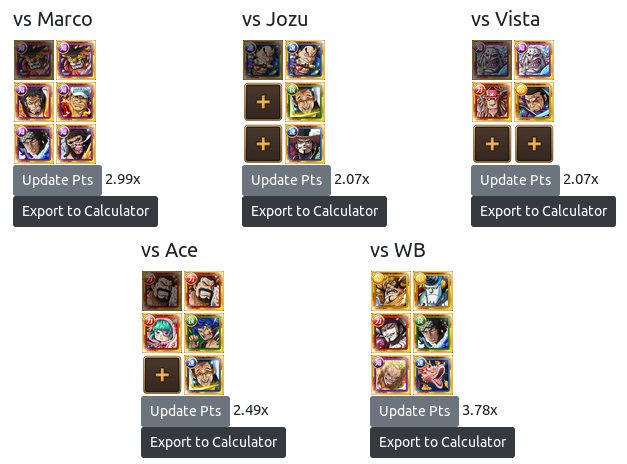
TM Whitebeard

Vs Vista
On Stage 3 your entire team will get paralyzed for 2 turns and get blinded (SFX removed) for 2 turns. Either bring a team that can take a few hits or a paralysis reducer just to be safe.
- Type: QCK
- HP: 360,000 (+32,400 per NAV Level)
- ATK: 3,600 (+164 per NAV Level)
- Premptive: 10 turn slot binds/seals top & bottom row units. Rewinds specials for the middle and bottom row units for 1 turn.
- HP < 20%: Raises ATK by 2.5x and prevents all damage for 4 turns.
Vs Jozu
Jozu spawns with 5 high DEF low HP fodders. They each have start at 6 HP and increases as you increase in TM levels.
- Type: STR
- HP: 5,000 (+450 per NAV Level)
- ATK: 10,500 (+474 per NAV Level)
- Premptive: 5 turn debuff protector & 5 turn DEF-UP (1,000 times regular DEF).
- DEF-UP 250 -> 250,000 for Jozu & 99,999 -> 99,999,000 for Mobs.
Vs Ace
- Type: DEX
- HP: 1,100,000 (+99,000 per NAV Level)
- ATK: 4,200 (+189 per NAV Level)
- Premptive: Boosts own ATK and lowers chain multiplier by 50% for 2 turns.
- Turn 1: Gives entire crew badly matching orbs and locks all orbs for 1 turn.
- Upon Death: Deals 1.5x his Attack.
This is another of those bosses were fighting in the main map will be better because his HP will greatly increase and as you continue fighting his huge HP will be annoying. Also you have to keep an eye on his death damage because it can and will kill you at higher levels. So make sure that you have a damage reducing unit on your team.
Vs Marco
- Type: PSY
- HP: 310,000 (+27,900 per NAV Level)
- ATK: 7,200 (+324 per NAV Level)
- Interrupt: Will heal to full each turn.
If it is not obvious you have to beat him in 1 turn. So INT based teams are ideal.
Vs Whitebeard
On Stage 3 upon death the Bazooka guy will put a “Makes Perfects harder to hit” debuff for 99 turns.
Stage 4
Disclaimer the information on Stage 4 Whitebeard is not 100% accurate because the places I used to get this information did not have his stats. So I just looked at TM Whitebeard Level 1 videos to have an idea on what his stats were and went from there. Since each NAV Lvl is just about a 5% increase.
However the Preemptive information is correct. It’s just the HP & ATK stats that are not accurate.
- Type: INT
- HP: ~700k (+ ~35,000 per NAV Level)
- ATK: ~4084 (+ ~205 per NAV Level)
- Premptive: Special binds/silence both your captains for 3 turns.
Stage 5
Spawns with 3 other mobs that I did not get their HP and ATK values.
- Type: INT
- HP: 1,550,000 (+139,500 per NAV Level)
- ATK: 10,056 (+450 per NAV Level)
- Premptive: Binds friend captain for 5 turns, 99 turn delay protector, 1 turn 3-hit Perfect barrier.
- Interrupt: Blows away 2 random units for 3 turns if you use an HP cut.
- First Attack (Turn 2): Deals 2x his ATK that turn.
Do not bring units that do HP cuts unless you plan on using them in Stage 4 or not plan on using them at all.
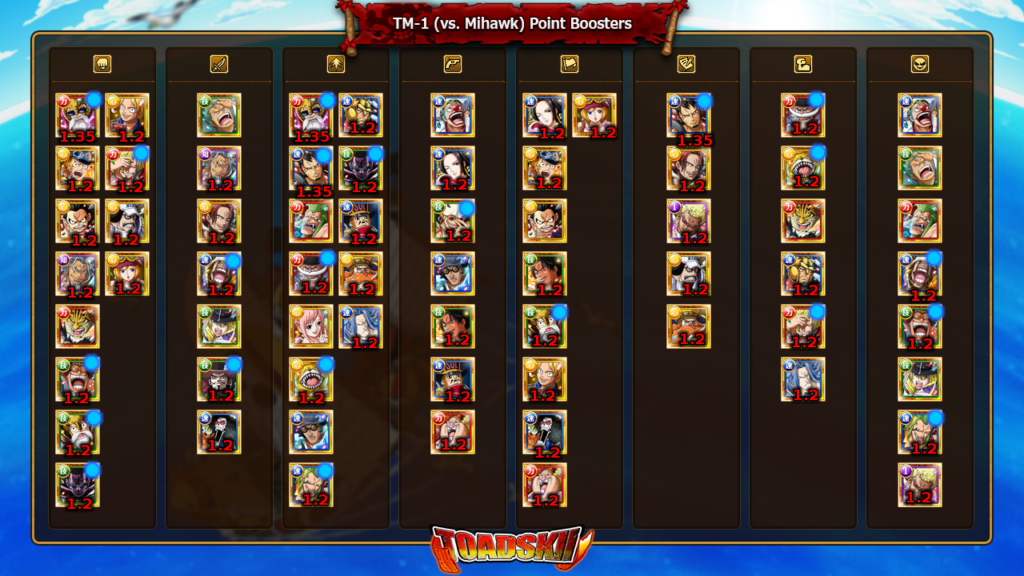
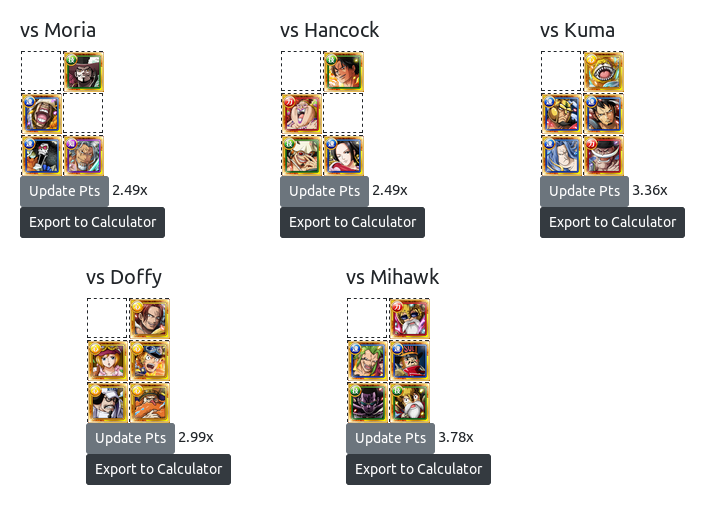
TM Mihawk

Current :

Outdated:

Kuma (PSY)
- HP: 455,000 (+25,025 per TM Level)
- 705,250 at Nav Lv 10
- 955,500 at Nav Lv 20
- 1,205,750 at Nav Lv 30
- Attack: 10,052 (+176 per TM Level)
- Pre-Emptive: Debuff protector for 98 turns and randomly blows away 1 bottom row unit.
- Every 4 turns: Blows away 1 random unit in the order of Bottom Row > Middle Row > Top Row
The idea behind this team is that you beat Kuma in the overworld before facing him again. Overall this team can deal enough damage to burst Kuma down in less than 3 turns. However as you increase in levels you may need to swap Zoro for another Diamante in order to make sure you beat Kuma.
Boa (PSY)
- HP: 281,680 (+15,492 per TM Level)
- 436,000 at Nav Lv 10
- 591,000 at Nav Lv 20
- 746,000 at Nav Lv 30
- Attack: 3,216 (+56 per TM Level)
- Pre-Emptive: Anti-Recovery for 19 turns and applies delay protector for 99 turns.
- HP < 20%: Binds entire crew for 20 turns.
- Stage 1-3: Beat normally while making sure your specials are ready for Boa stage.
- Stage 4: Attack normally.
- Stage 5: Beat the girls around Boa and then burst on Boa. Just make sure that you don’t get her below 20% or else.
- Another option you can do is to beat Boa in the overworld like with Kuma in order to make it easier.
Doffy (DEX + INT)
- HP: 2 Doffys one DEX & the other INT each having 271,800 (+14,949 per TM Level)
- 421k at Nav Lv 10
- 570k at Nav Lv 20
- 720k at Nav Lv 30
- Attack: 3,320 (+60 per TM Level)
- Interrupt: Upon defeating 1 Doffy he summons one more (occurs once).
- HP < 50%: Deals 50% of crew’s HP and randomly bind once unit for 3 turns.
Moria (DEX)
- HP: 362,500 (+19,937 per TM Level)
- 561k at Nav Lv 10
- 761k at Nav Lv 20
- 960k at Nav Lv 30
- Attack: 3,436 (+60 per TM Level)
- Pre-Emptive: Slot Bind/Seal entire crew for 10 turns.
- Interrupt: If you delay him he removes all positive buffs from your crew.
Test Team #2
- Stage 1-3: Stall for specials. Take advantage of the Zombie Foxes that turn your orbs into bomb orbs in order to get Whitebeard to below 30%.
- Stage 4: Beat Oars normally. You can use Ace special here to make sure that you are below 30% when fighting both Oars and Moria.
- Stage 5: Activate all HP cutting specials first then use all other specials. Just make sure to use Sanji before Ace if you didn’t use Ace on Stage 4.
TM Mihawk (Stage 4)
- HP: 700,000 (+71,830 per TM Level)
- 1,418k at Nav Lv 10
- 2,136k at Nav Lv 20
- 2,854k at Nav Lv 30
- Attack: 3,664 (+192.5 per TM Level)
- Pre-Emptive: PSY & INT units special bind for 10 turns and cut HP by 10%.
- After Turn 2: 10% HP cuts and normal attack.
TM Mihawk (Stage 5)
- HP: 1,366,000 (+71,830 per TM Level)
- 2,084k at Nav Lv 10
- 2,802k at Nav Lv 20
- 3,520k at Nav Lv 30
- Attack: 11,000 (+192.5 per TM Level)
- Pre-Emptive: 98 turn delay protection, DEF up (5 turns), randomly shuffles orbs (may include BLOCK), and 20% HP cut.
- After 1st Attack: 10% HP cut and enrage.
- HP < 50% (Attack): 16,500 damage.
- HP <50% (From a Special): Recovers to ~80% and random orb shuffle.
Test Team #2
- Stage 1-3: Beat normally while stalling for specials.
- Stage 4: Use Lucy special, hit 4 perfects, beat Mihawk.
- Stage 5: You should have Lucy’s 2x ATK boost then use all other specials. Just make sure that if you use Toy Soldier to use him first and to use Colo Lucy before Colo Kyros.